Placed in: Home arrow Programming arrow Webdesign arrow Advanced jQuery background image slideshow
Advanced jQuery background image slideshow

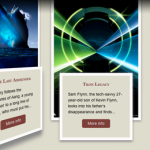
A couple of weeks ago, I received an e-mail from a guy named Patrick. He just visited the website from Philadelphia and wanted to know how to create the slideshow header that's on top of the page. Since I was also impressed by the effect, I took the time to recreate this effect myself. Our focus is the background image slideshow (including the text), not the other things (like the dropdown menu).

With the use of transparent PNG's, some HTML, pretty nifty CSS and jQuery, we can make this technique work. Read the rest of this article to learn how to create a beautiful advanced jQuery background image slideshow.

jQuery background image slideshow

It features changing text and playback controls. When the animation doesn't seem smooth, the images might not be loaded. This script can perfectly be combined with an image preloading plugin to get rid of this effect. Tested and works on Firefox, Safari, Chrome and Opera. I've used images with a width of 1500px, just to cover most of the currently used screen resolutions.

Demo jQuery background image slideshow   Download jQuery background image slideshow

Start up your HTML/CSS/jQuery editor and let's see how you can create this effect yourself! Of course, you can also download the source and dig through the code and learn from there. As always, comments are left on the source code to explain what it does.

The idea

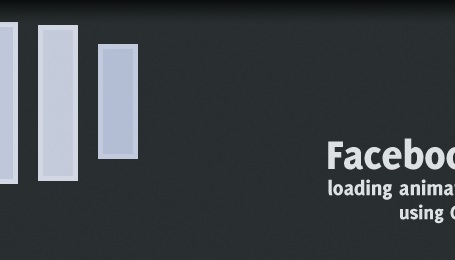
To understand what we need to make, I created a simple reference image. The two containers will get the background images set through jQuery and will be placed on top of each other when another image is loaded. We can fade the top container out to slowly show the container behind it.

The idea

Now that we truly know what we need to create, we can start coding!

HTML

First things first: I'm normally not a big fan of empty HTML elements which only purpuse is to be a handle for JavaScript. I'd rather let JavaScript dynamically create the element, just to keep the HTML clean (for SEO purposes for example). But in this example, I'm aiming at how to create this instead of what the best way is to create it.

Having said that, this is the HTML I came up with. Take note I left some parts out, but you can find them when downloading the source.

 
<div id="header">
 
   <!-- jQuery handles to place the header background images -->
   <div id="headerimgs">
      <div id="headerimg1" class="headerimg"></div>
      <div id="headerimg2" class="headerimg"></div>
   </div>
 
   <!-- Top navigation on top of the images -->
   <div id="nav-outer">
      <div id="navigation">
         <!-- Stuff in the navigation bar goes here -->
      </div>
   </div>
 
   <!-- Slideshow controls -->
   <div id="headernav-outer">
      <div id="headernav">
         <div id="back" class="btn"></div>
         <div id="control" class="btn"></div>
         <div id="next" class="btn"></div>
      </div>
   </div>
 
   <!-- jQuery handles for the text displayed on top of the images -->
   <div id="headertxt">
      <p class="caption">
         <span id="firstline"></span>
         <a href="#" id="secondline"></a>
      </p>
      <p class="pictured">
         Pictured:
         <a href="#" id="pictureduri"></a>
      </p>
   </div>
  
</div>

As you can see, we already created all the elements we expected to create when looking at the reference image. Take note of headerimg1 and headerimg2 which are the containers for the background images. The headernav contains three buttons that we use to control the slideshow. We also created some different handles for jQuery to easily manipulate the DOM, like firstline and secondline for the text.

This HTML is what we're going to use as the backbone of our webpage. Now on to add some design using CSS!

CSS

Like I said at the beginning of this article: The CSS in this example is pretty nifty. Therefor, I'll break it up in several parts for make some things more clear. Take note I don't sum up all the CSS properties; Just the important ones.

 
.headerimg { background-position: center top; background-repeat: no-repeat; position:absolute; }

This is actually the key to achieving this effect. Each headerimg has a background image (set by jQuery) which will be positioned on the center on top of the screen. By setting the no-repeat value, we only display it once. The position is set to absolute in order to place both the handles on top of each other.

 
#nav-outer { height:110px; position:relative; top:24px; background-image:url("../images/headerbg.png"); }

The navigation is set to a fixed height. The position is set to relative, so we can position it using the top property. The background-image is a transparent blue PNG, just for the nice effect it'll have. We could use the RGBA property here instead of the image, but that only works in CSS3 compatible browsers.

 
#firstline { background-image:url("../images/textbg.png"); float:left; display:block; }
#secondline { background-image:url("../images/textbg.png"); float:left; display:block; clear:both; }

Both the text lines have a transparent background image (white). By setting the display to block, we can use float:left to make them position next to eachother. I know you could better use one generic class to apply to both the elements, but since we already needed the two handles for jQuery in the HTML, I used this instead.

 
.btn { height:32px; width:32px; float:left; cursor:pointer; }
#back { background-image:url("../images/btn_back.png"); }
#next { background-image:url("../images/btn_next.png"); }
#control { background-image:url("../images/btn_pause.png"); }

The button controls are pretty easy to understand. The generic .btn class provides a width and height and the proper cursor. Each element has a different icon which the user will see to navigate through the images.

That covers most of the important CSS. On to the most interesting part: jQuery.

jQuery

Since we need to load all the images and text dynamically, we need a variable to store all the information. We create an array filled with objects that contains all the information we need like this:

 
var photos = [ {
      "title" : "Title 1",
      "image" : "SourceImage1.jpg",
      "url" : "http://www.url.1",
      "firstline" : "First line 1",
      "secondline" : "Second line 1"
   }, {
      "title" : "Title 2",
      "image" : "SourceImage2.jpg",
      "url" : "http://www.url.2",
      "firstline" : "First line 2",
      "secondline" : "Second line 2"
   }
   // More pictures if we want
];
 
var slideshowSpeed = 6000;

The title will be used at the "Pictured" text. The image is the background image we need and the url will be used twice (once at the second line text and once in the "Pictured" text). The firstline and secondline are self-explanatory.

The slideshowSpeed variable is what we use for the speed (in milliseconds) for the slideshow to display images once the autoplayback functionality is active. Now let's first take a look at the button controls.

 
// Backwards navigation
$("#back").click(function() {
   stopAnimation();
   navigate("back");
});
  
// Forward navigation
$("#next").click(function() {
   stopAnimation();
   navigate("next");
});
  
var interval;
$("#control").toggle(function(){
   stopAnimation();
}, function() {
   // Change the background image to "pause"
   $(this).css({ "background-image" : "url(images/btn_pause.png)" });
     
   // Show the next image
   navigate("next");
     
   // Start playing the animation
   interval = setInterval(function() {
      navigate("next");
   }, slideshowSpeed);
});

As you might notice, we're calling sevaral functions here that need to be created: stopAnimation() and navigate(direction). We use the setInterval() method from JavaScript to create a loop to change the images. We stop the animation when the user starts using the next and back button (and the pause button ofcourse). Let's take a look at that stopAnimation() function.

 
var stopAnimation = function() {
   // Change the background image to "play"
   $("#control").css({ "background-image" : "url(images/btn_play.png)" });
     
   // Clear the interval
   clearInterval(interval);
};

This is a pretty basic function. We clear the interval by calling clearInterval to stop the animation loop. Now, for the more interesting function: navigate(direction).

 
var activeContainer = 1;  
var currentImg = 0;
var animating = false;
var navigate = function(direction) {
 
   // Check if no animation is running. If it is, prevent the action
   if(animating) {
      return;
   }
  
   // Check which current image we need to show
   if(direction == "next") {
      currentImg++;
      if(currentImg == photos.length + 1) {
         currentImg = 1;
      }
   } else {
      currentImg--;
      if(currentImg == 0) {
         currentImg = photos.length;
      }
   }
  
   // Check which container we need to use
   var currentContainer = activeContainer;
   if(activeContainer == 1) {
      activeContainer = 2;
   } else {
      activeContainer = 1;
   }
  
   showImage(photos[currentImg - 1], currentContainer, activeContainer);
  
};

This function only checks what stuff to make active (like selecting the correct container and image) and passes is on to the showImage() function. Let's take a look at how that one works.

 
var currentZindex = -1;
var showImage = function(photoObject, currentContainer, activeContainer) {
    animating = true;
   
    // Make sure the new container is always on the background
    currentZindex--;
       
    // Set the background image of the new active container
    $("#headerimg" + activeContainer).css({
        "background-image" : "url(images/" + photoObject.image + ")",
        "display" : "block",
        "z-index" : currentZindex
    });
       
    // Hide the header text
    $("#headertxt").css({"display" : "none"});
       
    // Set the new header text
    $("#firstline").html(photoObject.firstline);
    $("#secondline")
        .attr("href", photoObject.url)
        .html(photoObject.secondline);
    $("#pictureduri")
        .attr("href", photoObject.url)
        .html(photoObject.title);
       
    // Fade out the current container
    // and display the header text when animation is complete
    $("#headerimg" + currentContainer).fadeOut(function() {
        setTimeout(function() {
            $("#headertxt").css({"display" : "block"});
            animating = false;
        }, 500);
    });
};

As you can see, it uses the variables to set everything in the correct way. Placing the correct image on top of the other one, hiding the text, setting the new text and displaying it after the fadeOut is complete. Take note of the animating variable we set, so the user can't navigate when the animation is playing.

And that's about it! This is one way to create a beautiful large background image slideshow.

Conclusion and Download

For some final touches, I added some content in the navigation part of the page. I really like the way how this technique looks and I see this could be used in loads of websites. You could improve the script by preloading the images, so the animation will be smoother for first-time visitors. Also, you could dynamically add the HTML elements to the DOM using jQuery to keep your HTML clean. Other than that, I think this is a great way to display big background images on any website.

Demo jQuery background image slideshow   Download jQuery background image slideshow

What do you think? Do you see where you could improve the script? Or do you want to use it in your next project? Feel free to share!


Tags:  slideshow jquery tutorial webdevelopment

Interested in this topic? You might enjoy another article I've written called

Did you like this article? Subscribe to my feed or email to keep updated on new articles.

Spread the word and submit to:
Digg!Reddit!Del.icio.us!Facebook!Technorati!StumbleUpon!Newsvine!Furl!Ma.gnolia!
Comments
Add NewSearchRSS
Richie - Size does matter   2010-04-06 08:34:49
Gravatar image One of the most beautiful image sliders I have ever seen. Since it covers the entire width of the page, it gives a very professional look and the buttons are quite the perfect match as well.

Great work, Marco.
Umut Muhaddisoglu   2010-04-06 08:42:16
Gravatar image Marco,

This looks awesome, great job.
moabi - hi there   2010-04-06 08:47:07
Gravatar image like it, it's nice because of the full width, though a little fade effect would be really nice to make the transitions (or other effect, we know you're good at exploring jquery !)
keep us the good work !
thx
Marco - It does fade!   2010-04-06 12:20:48
Gravatar image Hi Moabi! First, thanks for your comment!

The images do fade into each other, but because the images aren't preloaded, you don't see that effect. One you've seen all the images (and they're in the browser cache), you'll see the fade effect in it's full glory ;) .
Sid   2010-04-06 14:10:27
Gravatar image Cool solution Marco
I found a different method, here is a demo http://clienti.sid05.com/turis2010
Alex Flueras - SW   2010-04-06 17:16:03
Gravatar image Simply superb. Thanks so much for sharing.
Glenn   2010-04-06 17:50:22
Gravatar image So how does this handle loading of the images? Say I want to rotate 50 different images, is the script going to try download them all at once or just as needed?

I would love to see an update to this article showing the preloading of the images, but only preload a couple at a time since the images are very large.

Thanks for the article.
Marco - Cleaver thinking!   2010-04-11 08:50:50
Gravatar image Very clever thinking Glenn - I didn't thought about that. You could easily preload all the images, but when you have 50 of them, that would be hard (and bandwidth consuming).

You could alter the "navigate" to preload the upcoming image, so it'll be easily retrieved once it's needed the next time (the time when the image is actually needed).

Thanks for this great input!
Glenn   2010-04-15 17:45:19
Gravatar image What do think about modifying this script to generate all html with jquery? That way it would degrade gracefully on devices and browsers that don't support javascript.

I was thinking the only div in the document should be and everything else should be inserted with jquery.

Also, do you have any plans on updating this script based on the comments of this page? Just curious.
Marco - Don't know   2010-04-19 07:36:49
Gravatar image Yup - like I said in the article too, I'm not a big fan of empty HTML elements, just to be used as "handles" for jQuery. I did create it that way, just for the purpose to create an easier to understand tutorial.

You could easily place all the images on top of each other using CSS, so the top image would only be displayed when no JavaScript is enabled. Using jQuery, you could dynamically create the full gallery.

Anyway, I normally don't update any "old" scripts, simply because I don't have the time and prefer to come up with new ideas instead of changing the old ones. I hope you understand!
Andy Sowards   2010-04-06 18:20:28
Gravatar image Really nice slideshow script - I will have to try it out!

Thanks!
Abi   2010-04-06 19:03:42
Gravatar image Thanks- this is exactly what I was looking for!
suhni california - auto resize to window   2010-04-06 19:12:44
Gravatar image http://www.buildinternet.com/project/supersized/

this one resizes to fit browser window
Don   2010-04-07 02:10:55
Gravatar image Excellent work!
Thanks heaps.
Kawsar Ali   2010-04-07 04:17:10
Gravatar image Great Slideshow Marco. Keep up the amazing work. Cheers mate
Martin   2010-04-07 16:58:07
Gravatar image Looks really clean. All the little details add up beautifully. Great work!
Federico Pian   2010-04-07 17:18:35
Gravatar image Great work! is there any fix for preloading images? i think it's not a good impact for a visitor showing the slideshow not work perfectly
Marco - Google is your friend   2010-04-07 19:33:54
Gravatar image Hi Federico! Thanks for your comment. You're totally right about the impact, but I didn't want to waste my time to write the image preloader, since there are loads of solutions that you can find on the web. Google "jQuery Image Preload" and you're ready to go! Good luck!
Federico Pian   2010-04-08 00:16:35
Gravatar image Ok thanx very much i will try to fix the problem and maybe write a solution on my blog ;)
lesemu   2010-04-08 01:08:12
Gravatar image NICE!!! Really looking forward to putting this to good use. Great work.
rudy - song operated   2010-04-08 01:18:49
Gravatar image I have one that's similar, using the nivo slider and wordpress
@ songoperated.com
It was a pain in the ass to get it just right.
Jeremy   2010-04-08 03:02:22
Gravatar image Too many empty s in the markup, no?
Jeremy   2010-04-08 03:02:38
Gravatar image Sorry, that says divs. Too many empty divs.
Marco - True   2010-04-11 08:55:26
Gravatar image Yup, that's true. In the "HTML" part of this tutorial I explain that I'm note a huge fan of utilizing empty DIV's just for jQuery handles, but in this example it was just to make things clear.
Ivan Lazarevic   2010-04-08 10:45:46
Gravatar image It would be nice if text appearance have fading effect, too.
Marco   2010-04-11 08:56:47
Gravatar image Personally, I really like the "disappear" and "reappear" effects from the text. If the text would fade too, it would look more like one big image (including the text).

Still, you could easily make the fade effect applied to the text too ;) .
Patrick   2010-04-09 08:08:33
Gravatar image Great work Marco, thank you for taking the time to make this tutorial. I'm implementing it right now in my new website.

Cheers !!
Marco - Good!   2010-04-11 08:57:15
Gravatar image Glad you liked it Patrick - hope I helped you enough to use it on your website! Good luck!
Felipe - Keyboard navigation ?   2010-04-11 06:42:17
Gravatar image Adding controls (prev, stop and next) on slideshows is rarely explained (and rarely done) so congratulations for that ! :)
Though theses controls are div elements and as such won't receive focus. Alas, those that use only the tab key to navigate are also more likely to need to stop the slideshow.
Using the tabindex attribute is likely to be a PITA but these controls could as well be plain links created (they don't have to exist when JS is disabled) and managed with jQuery.
Marco - You're right!   2010-04-11 08:59:40
Gravatar image You're absolutely right Felipe! Plain links would be better indeed (especially when thinking about keyboard navigation). By catching the "click" event in jQuery and preventing the default behavior, the same kind of effect can be recreated, but the tab focus would work.

Thanks a lot for your comment and thinking with me here!
Kevin - Wonderful tutorial   2010-04-19 15:26:37
Gravatar image Your post is very helpful to me,Thanks a lot.
Mashkovtsev - clideshow   2010-04-19 20:54:59
Gravatar image Beautifull slideshow... i love it))) :lol:
5-Squared - Awesome   2010-04-20 00:11:59
Gravatar image Really great stuff here. Definitely bookmarking this one for some future work. Thanks a lot for sharing.

:D
atiya - Problem!   2010-04-24 12:58:29
Gravatar image source file is corrupt i cant download it.
Marco - Try again   2010-04-26 16:51:00
Gravatar image Try downloading it again, it might be corrupted while downloading. It seems to be working fine over here!
Sido - Random   2010-04-29 16:26:45
Gravatar image Is it possible to get the images displayed randomly?
Marco - Yup!   2010-05-01 08:30:21
Gravatar image Yup - you'll just have to shuffle the images array that we build, and you're ready to go!
Javier - Designer   2010-05-21 20:03:07
Gravatar image Hello, find your tutorial very useful but I'm having trouble setting up a background image to rotate simultaneously in the background since you are setting the z-index to -1 the background appears in front of the images, can you show me how to change that?
Matthew - Firefox issues   2010-06-07 13:36:54
Gravatar image Hi,

Really love this - thanks for posting! I have noticed though in Firefox v.2 the images do not display in the demo but does work on the Philadelphia website. It performs perfectly in FF3.
Gridfox - Random Array   2010-06-08 11:06:01
Gravatar image This is really neat, love the html text over the images and the navigation. Any idea how to make the images display at random? You mentioned shuffling the images array above, how would this be done? any help appreciated :lol:
Cody - Images Showing   2010-06-15 19:49:36
Gravatar image Any reason why the next image in line flickers below the current image when the transition is happening. I can't get it to go behind everything so that next image doesn't show up at all.
peachepé   2010-06-15 22:04:06
Gravatar image I integrated a prealoder for this slideshow, email me if you would like to have it.
Mart   2010-06-24 09:02:30
Gravatar image Yes please, it would be most helpful. What's your email?
Bret - Preloader, please.   2010-07-06 03:08:53
Gravatar image I would be interested to see how you incorporated a preloader as well. Please share if you can. Thanks!
hrayr   2010-08-24 04:18:39
Gravatar image hello, can I see the preloader you did for this slidehsow?thank you
ma website design   2010-06-21 19:47:15
Gravatar image Am I mistaken or is this just for the front-end of developing? I wish there were great back-end widgets
Dave Q - flickr integration   2010-06-24 10:11:03
Gravatar image Wondering if anyone has integrated this with Flickr API or RSS?

how do you edit the script.js to get photos from Flickr?
Dani - HTML   2010-06-27 11:40:05
Gravatar image Hello,

Congratulations for your design! My question is: Is there templete for this site? I wanna make extra pages to this site and I don't know how to conservate the design. Thank you!
Sean   2010-06-29 21:29:38
Gravatar image First off, thanks for the background slideshow. But, I noticed if the viewport ever creates a horizontal scroll (from elements outside of the slideshow), the slideshow stays static to the page when horizontally scrolled, creating a gap between where the image was cut off and where the page is scrolled to. Any idea how to fix this?
Sean   2010-06-30 13:39:29
Gravatar image I may have found the answer to my question... just had to apply a 'min-width' to the slideshow container (though not IE6 friendly).
Farhan - Thanks   2010-07-02 04:02:25
Gravatar image Thanks a lot for this sharing :)
lily   2010-07-30 13:57:41
Gravatar image Great!

Are you planning to add a feature like thumbnails-buttons? When click on first button - show first image etc. It will be awesome!!! :cheer:
felipe   2010-08-05 13:36:30
Gravatar image Hi Marco! thx for the script, it's working really good so far, much better than supersized, for my purpose.

The only thing, is that I just can't make the pics to go random, and I've tried different ways.

Could you please explain with some detail how can we do this?

Please mate, thx.
Anoop D - Nice Tutorial   2010-08-31 13:23:11
Gravatar image Hi Marco,

That was a great tutorial .. i tried it in a wordpress theme .. but it is not working ...:(
i dont know why .. the backgrounds are given in the css in the format
background-image:url(./images/imagename.jpg)

I just tweaked the script to

"background-image" : "url(./images/" + photoObject.image + ";)",

and in firebug it is showing the sameway .. but images are not showing :( . Have you ever tried it in wordpress .....
Would be grateful to know what i did wrong ..

Ty once more for the great work
Anonymous - re: Nice Tutorial   2010-09-02 13:04:22
Gravatar image Hi Marco,

That was a great tutorial .. i tried it in a wordpress theme .. but it is not working ...:(
i dont know why .. the backgrounds are given in the css in the format
background-image:url(./images/imagename.jpg)

I just tweaked the script to

"background-image" : "url(./images/" + photoObject.image + ";)",

and in firebug it is showing the sameway .. but images are not showing :( . Have you ever tried it in wordpress .....
Would be grateful to know what i did wrong ..

Ty once more for the great work


I found the problem is that the display:block is not changing to display:none
Read more...
Name:
Email:
  Gravatar enabled.
Website:
Title:
UBBCode:
[b] [i] [u] [url] [quote] [code] [img] 
 
 
:angry::0:confused::cheer:B):evil::silly::dry::lol::kiss::D:pinch:
:(:shock::X:side::):P:unsure::woohoo::huh::whistle:;):s
:!::?::idea::arrow:
 
Security Image
Please input the anti-spam code that you can read in the image.
Unsubscribe from e-mail notifications.
 
< Prev   Next >
Subscribe

5407 people are subscribed for free to receive high quality articles.