Placed in: Home  Art Photoshop Making a 3d scene using 3d models in Photoshop comprar viagra en españa
comprar viagra online
comprar viagra generico barato
comprar cialis generico online
comprar cialis online seguro
comprar viagra online
comprar viagra generico barato
comprar cialis generico online
comprar cialis online seguro
| Making a 3d scene using 3d models in Photoshop |
|
One of the coolest new features of Photoshop CS3 extended is the possibility to import 3d models. Together with vanishing point they can really give you a good 3d look-and-feel in Photoshop. In this tutorial, we'll be creating a nice 3d scene using 3d models. This was my first time working with this technique, so I haven't perfect it (yet). Still, it's pretty fun to play around with and if you've never worked with 3d models before, you'll learn a whole lot of new things.  My PSD file of this tutorial was to big to put online (83 MB) because of the many 3d models, but you can download a wallpaper pack containing my final result in high resolution in 2 different sizes (1440x900 (widescreen), 1600x1200 (normal)). Making a 3d scene using 3d models in Photoshop For the floor, create a New File (Ctrl + N) with a width of 50 and a height of 50. Grab your Paint bucket tool (G) and fill a background color of #000000. Right-click on the black layer and select Blending Options. In the blending options window, select stroke. Set the size to 2 px, a color of #FFFFFF and position set to inside. Now define this image as a pattern by going to Edit > Define Pattern.... Give your pattern a name, press "OK" and close your file.  Let's get started with the actual artwork. Create a New File (Ctrl + N) with a size of 1600 x 1200. Fill the background with #000000 using the Paint bucket tool (G). Create a new layer above the background layer. Grab the Gradient Tool (G) and make sure it's set to Radial Gradient. Set your foreground color to #870000 and draw a gradient circle in the middle. Delete the bottom part using the Rectangular Marquee tool (M). Draw a 1 px line right under the half gradient using the Single Row Marquee Tool. Fill this single row with #870000. This is the base of the image which we'll be working with.  Create a new layer on top of all other layers. Now go to Edit > Fill (Shift + F5). Set the Use to Pattern and select your custom made pattern you created in the first step. Press "OK" to accept the settings. The new layer will now have a fill of your pattern. Transform the pattern layer using Free Transform (T). Change the height to fit the bottom part of your image (where the gradient stops). With the pattern-layer still selected, go to Edit > Transform > Perspective. Hold Shift and drag the left-down corner of the layer to the left. This will give your pane a bit more perspective, making it look even more 3d. Set the opacity of this layer to 50%.  Time to import your 3d model (*.3DS file). I'll be using a Doge Viper model created by FallingPixel. Import the 3d model by going to Layers > 3d Layers > New Layer From 3d File. Browse to your downloaded model and import it into Photoshop. Right-click on the new 3d layer and select Transform 3d model. A new toolbar on the top of Photoshop will show up. Now Scale the 3d object (Z) to make it fit on your workspace. 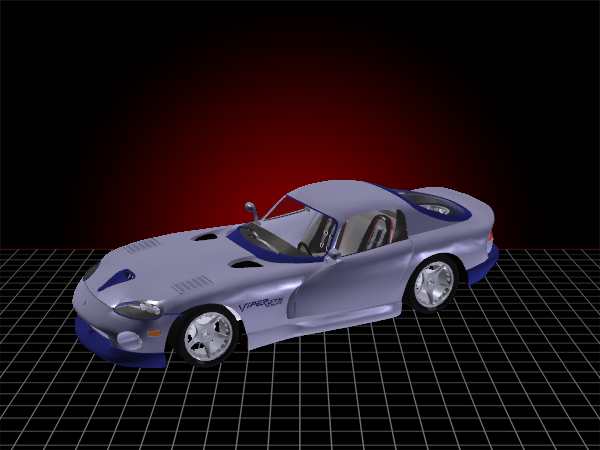 Let's start pimping that ride. Expand the layer called "DodgeViper" by clicking on the small arrow next to the layer name. You'll see a layer called Textures containing different texture sources. Double click on the BODY texture layer to edit it's contents. Change the canvas size of the texture file by going to Image > Canvas Size. Change this to 500 x 1000. This allows you to get much more detail in the texture. This part is all up to you. Change the texture in the way you want to see it. I created the texture that you can see below, using the colors #3d3fae and #FFFFFF. I also added a couple of Floral brushes, just to show the effect. Save the texture (Ctrl + S) and your 3d model will have the new texture automatically applied. You can change all other textures too if you like. I didn't change any other than the BODY. 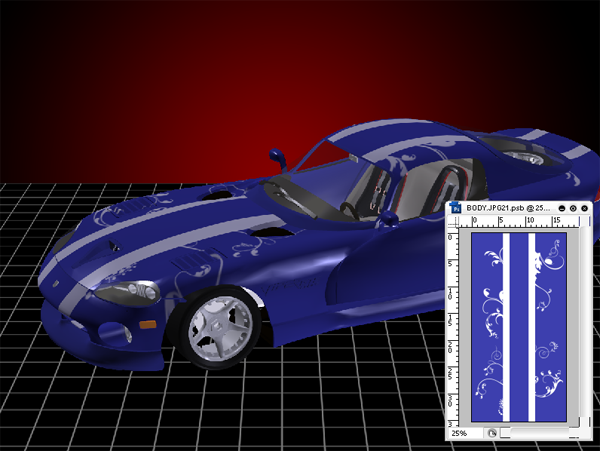 Right-click on the 3d layer and select Transform 3d model. In the 3d toolbar, select Lightning & Appearance settings and set Lighting to Day Lights. This will give your 3d model a much lighter and bright color. Duplicate the layer, creating more models. Transform these separately using the 3d toolbar to Rotate and Move them around. This really brings out the best of the 3d modeling, because you're showing different angles of the model.  I found the next step the hardest one of the whole process and really shows why Photoshop isn't a 3d modeling program. We'll be adding reflections of the model on the floor pane. To do so, duplicate the model you want to show the reflection from. Turn this layer totally upside down in the 3d toolbar. In this example, I was only seeing the bottom part of the Dodge Viper. Place these reflections right beneath their original layer and set the opacity to 30%. 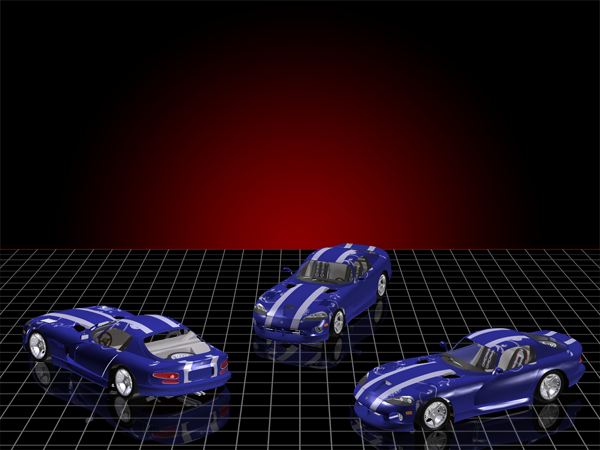 To improve the 3d look-and-feel, I added a swirl to the composition. It looks like as if the swirl is going over, under and behind the 3d models. Create a new layer on top of all your other layers. Grab your Pen Tool (P) and create a Path. Try making it look fancy, as if it is really turning around any parts of your 3d models. Grab a basic brush with a diameter of 6 px with a hardness of 100% and the color #FFFFFF. For Photoshop CS3, open up your Brushes palette (F5). Check Shape Dynamics and set Control to Pen Pressure. Right click in your paths palette on your just created work path and select Stroke path... The source is a brush and make sure you check the Simulate Pressure box: It'll give the nice, smooth edges. You can now delete your path. Get rid of the parts of the swirl that you want to look like as if they are behind the models. You can use the Eraser Tool (E), but since I'm a fan of non-destructive Photoshopping, I would recommend creating a Layer Mask and brushing those parts away. 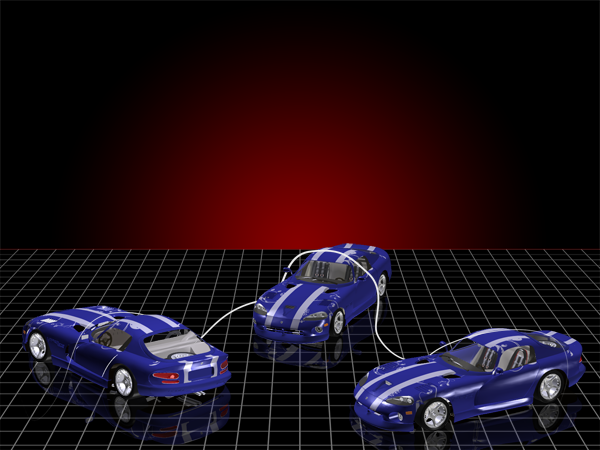 As a final touch, I added some specifications of the Dodge Viper to the composition. The title is using a font called Alien League, all others are using a font called BN Deep Blue. I also added the awesome Dodge Viper logo to show what the artwork is about. 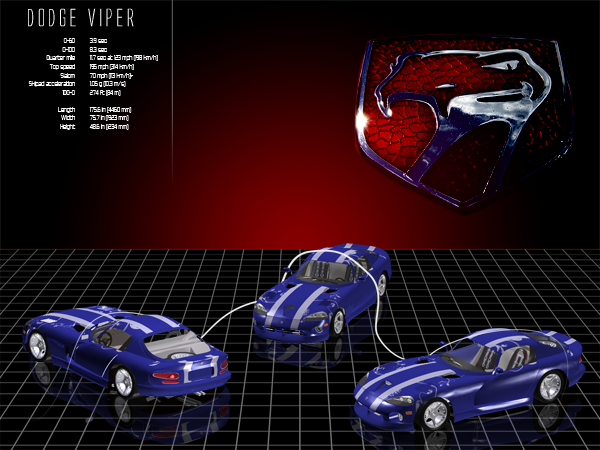 Conclusion & download Although Photoshop isn't as good with 3d models as programs like 3d Studio Max or Maya, it was still fun to play around with. I know I haven't perfected this technique myself (especially when looking to the reflections), but personally I think the outcome is still really good. My PSD file of this tutorial was to big to put online (83 MB) because of the many 3d models, but you can download a wallpaper pack containing my final result in high resolution in 2 different sizes (1440x900 (widescreen), 1600x1200 (normal)). Tags: car 3d model tutorial photoshop Interested in this topic? You might enjoy another article I've written called |


| < Prev | Next > |
|---|
| Search |
|---|
| Or try the sitemap |
Friends of Marcofolio.net
 2007 - 2018 Marcofolio.net
This (we)blog brings you information about (web)design, blogging tips, (programming) tutorials and much, much more. I can't describe Marcofolio.net in words: Just look around and be amazed. Many (new) visitors have a habit to stick around, just because of the variety of articles.
Have fun reading this blog and don't forget to subscribe to the feed to keep updated on the latest articles.